Clerk.io can be integrated in several languages that share the same WooCommerce backend
When using WPML in WooCommerce, you should be able to differentiate your languages by URL, like this:
If you have unique URLs like this, you can extend the WooCommerce plugin to support WPML.
1. Create Stores
The easiest way to implement Clerk.io in multiple domains in standard setups is by creating a separate Store for each domain in my.clerk.io.
This way, you can separate products, sales, currencies etc. to keep track of each domain.
1. Start by creating your main Store and follow the Setup Guide to connect your Store to Clerk.io, and choose the Recommendations and/or Search Results you that you want to display on your webshop.
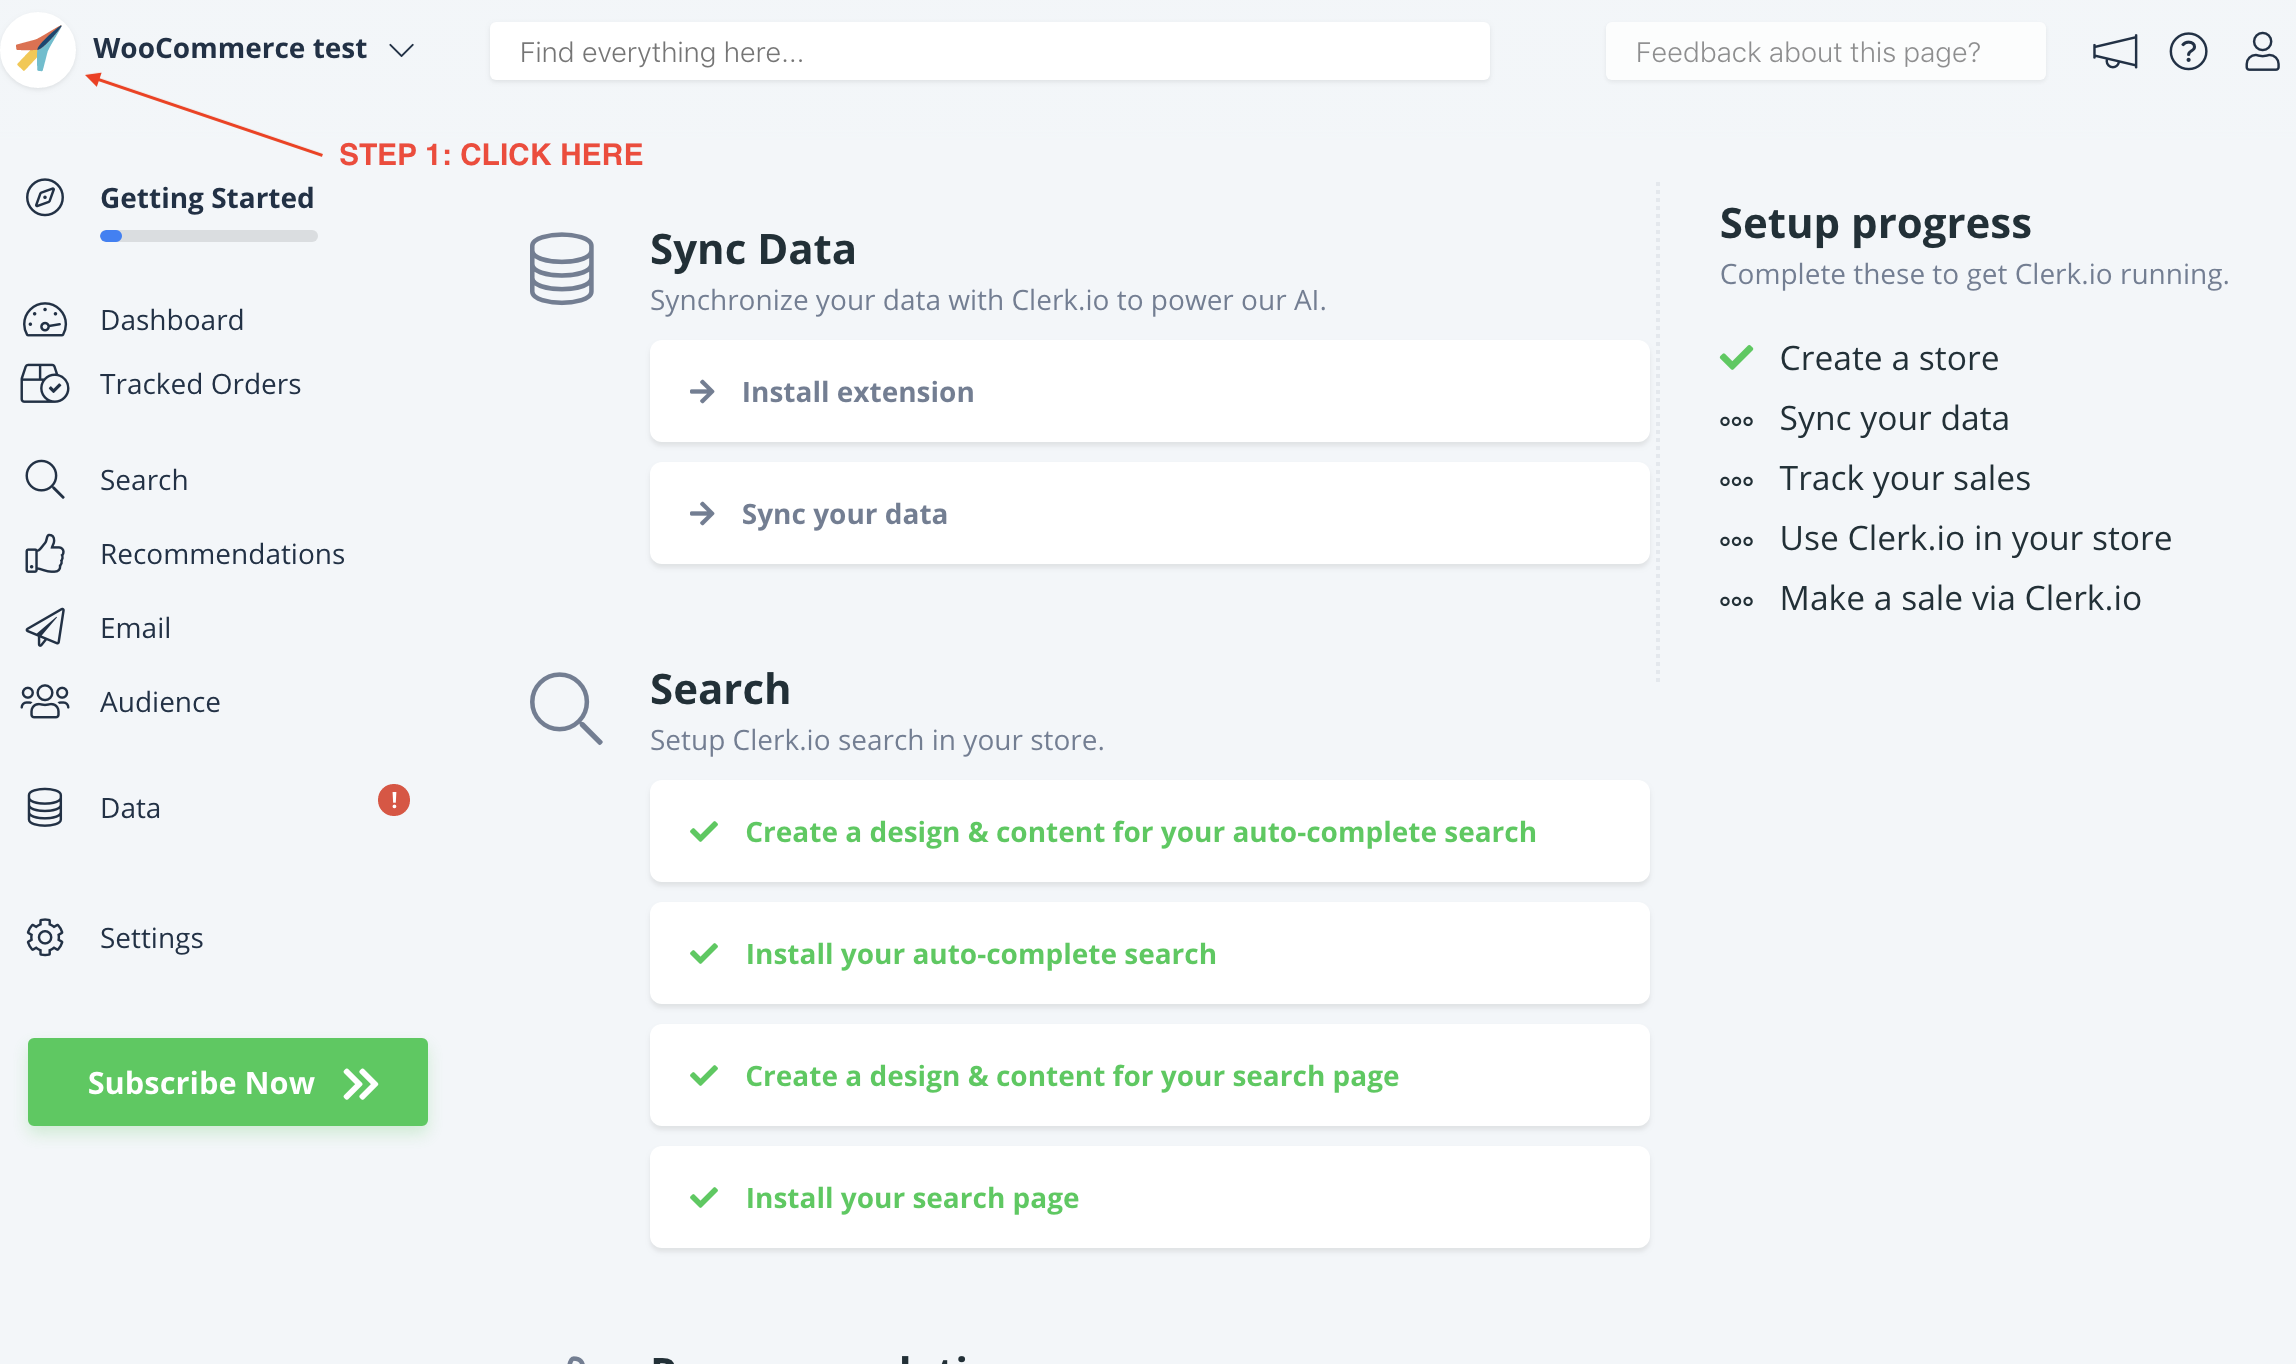
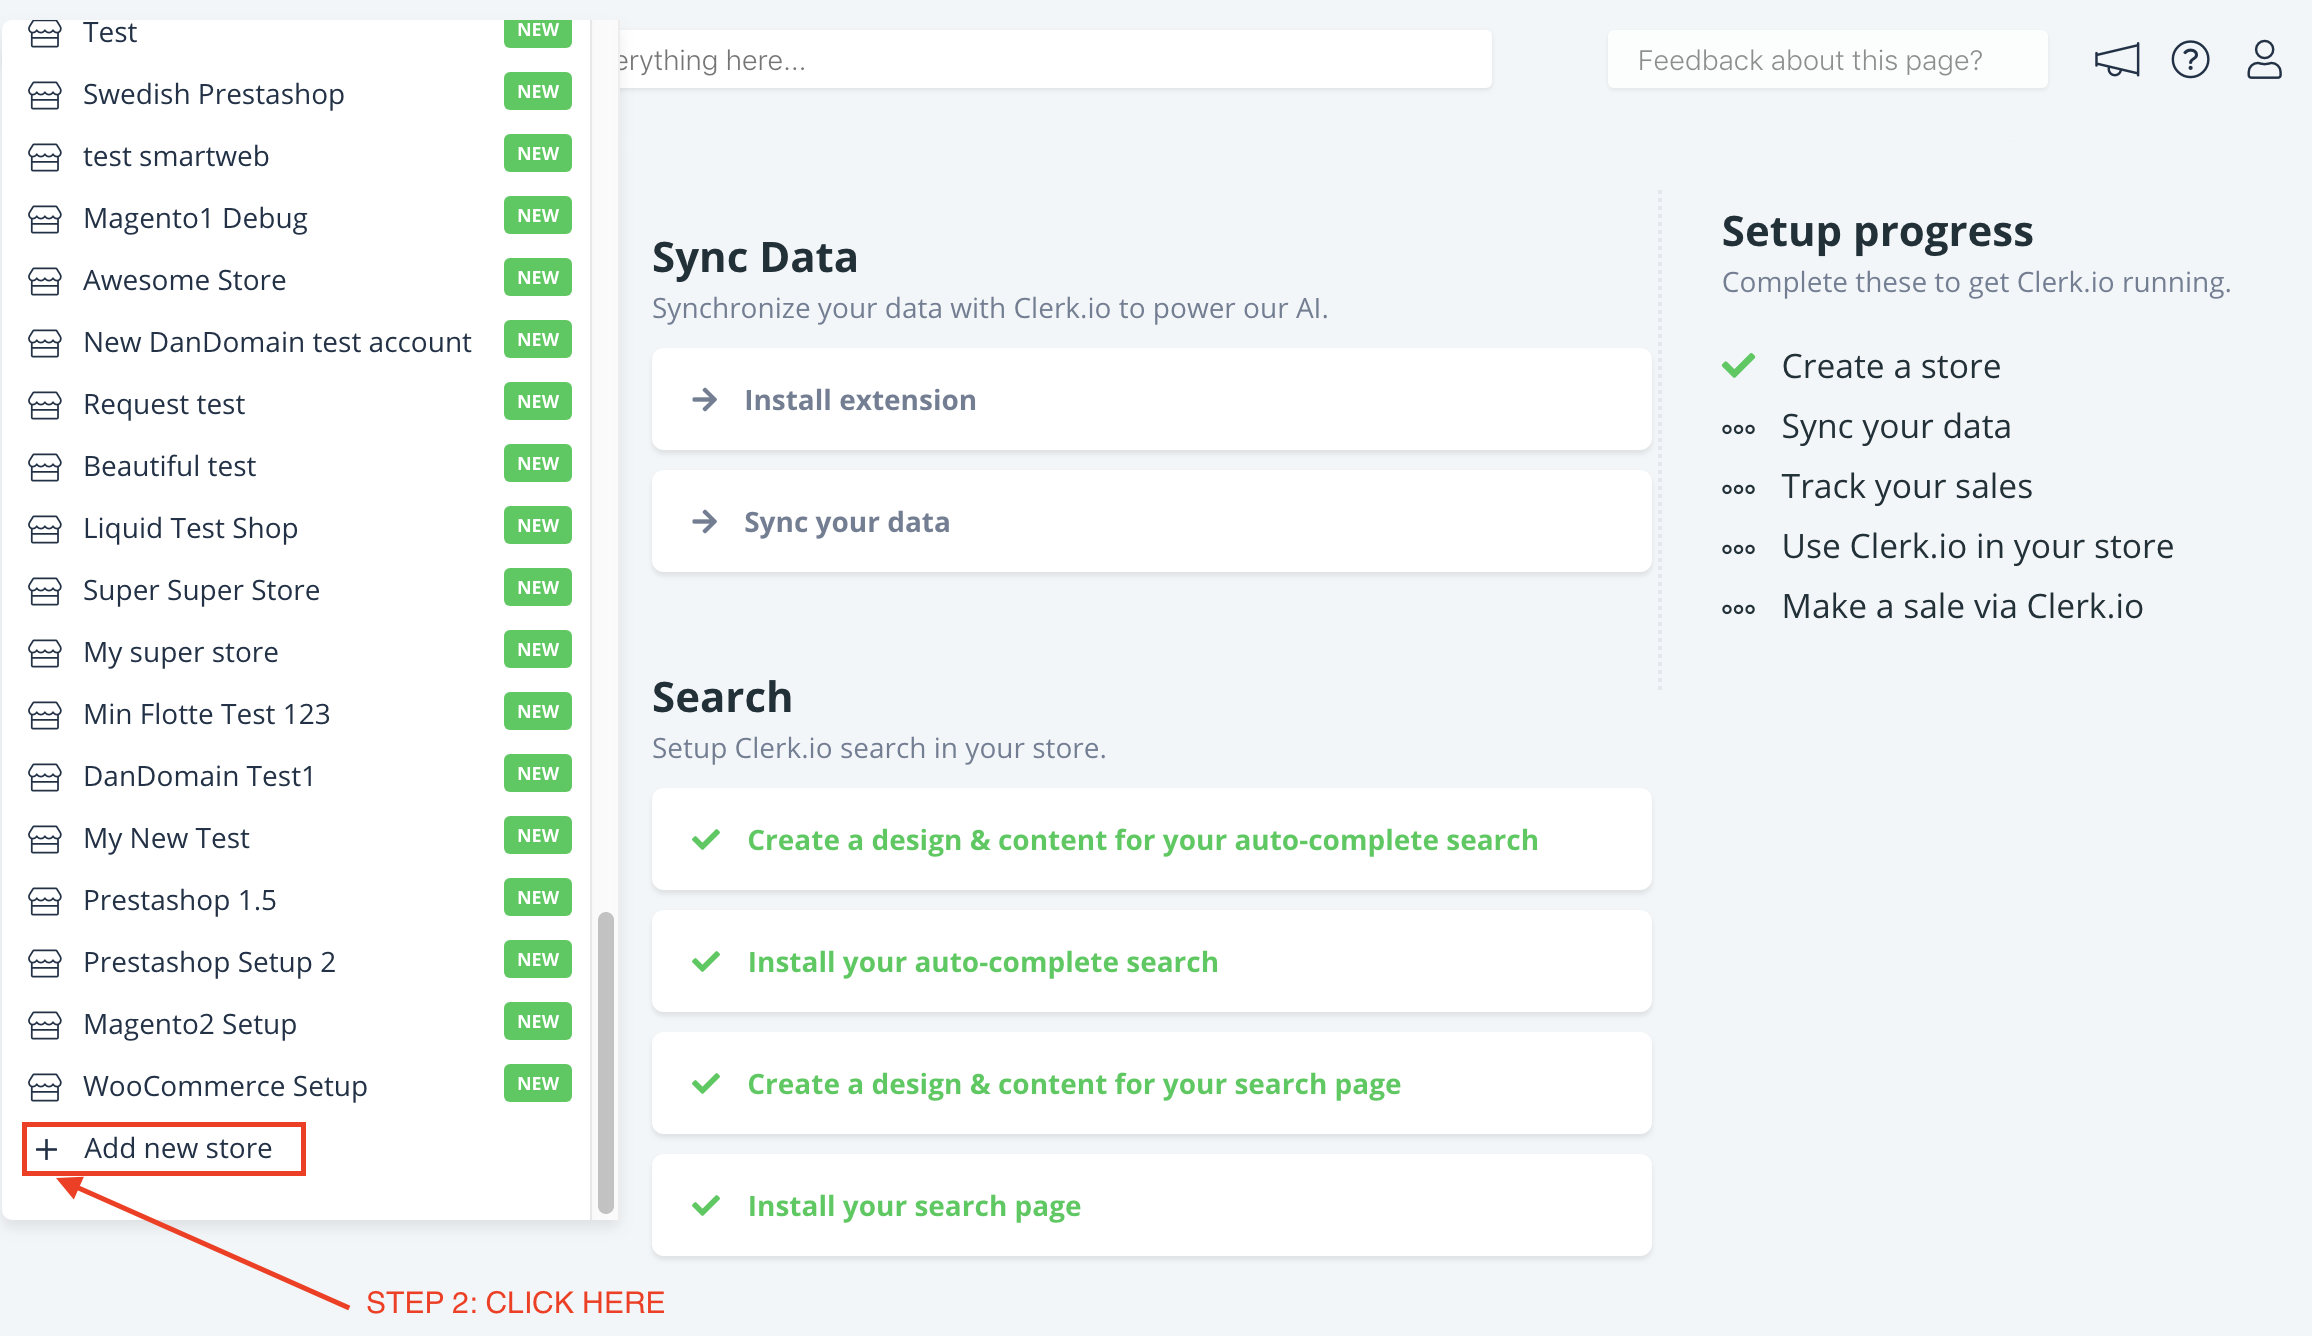
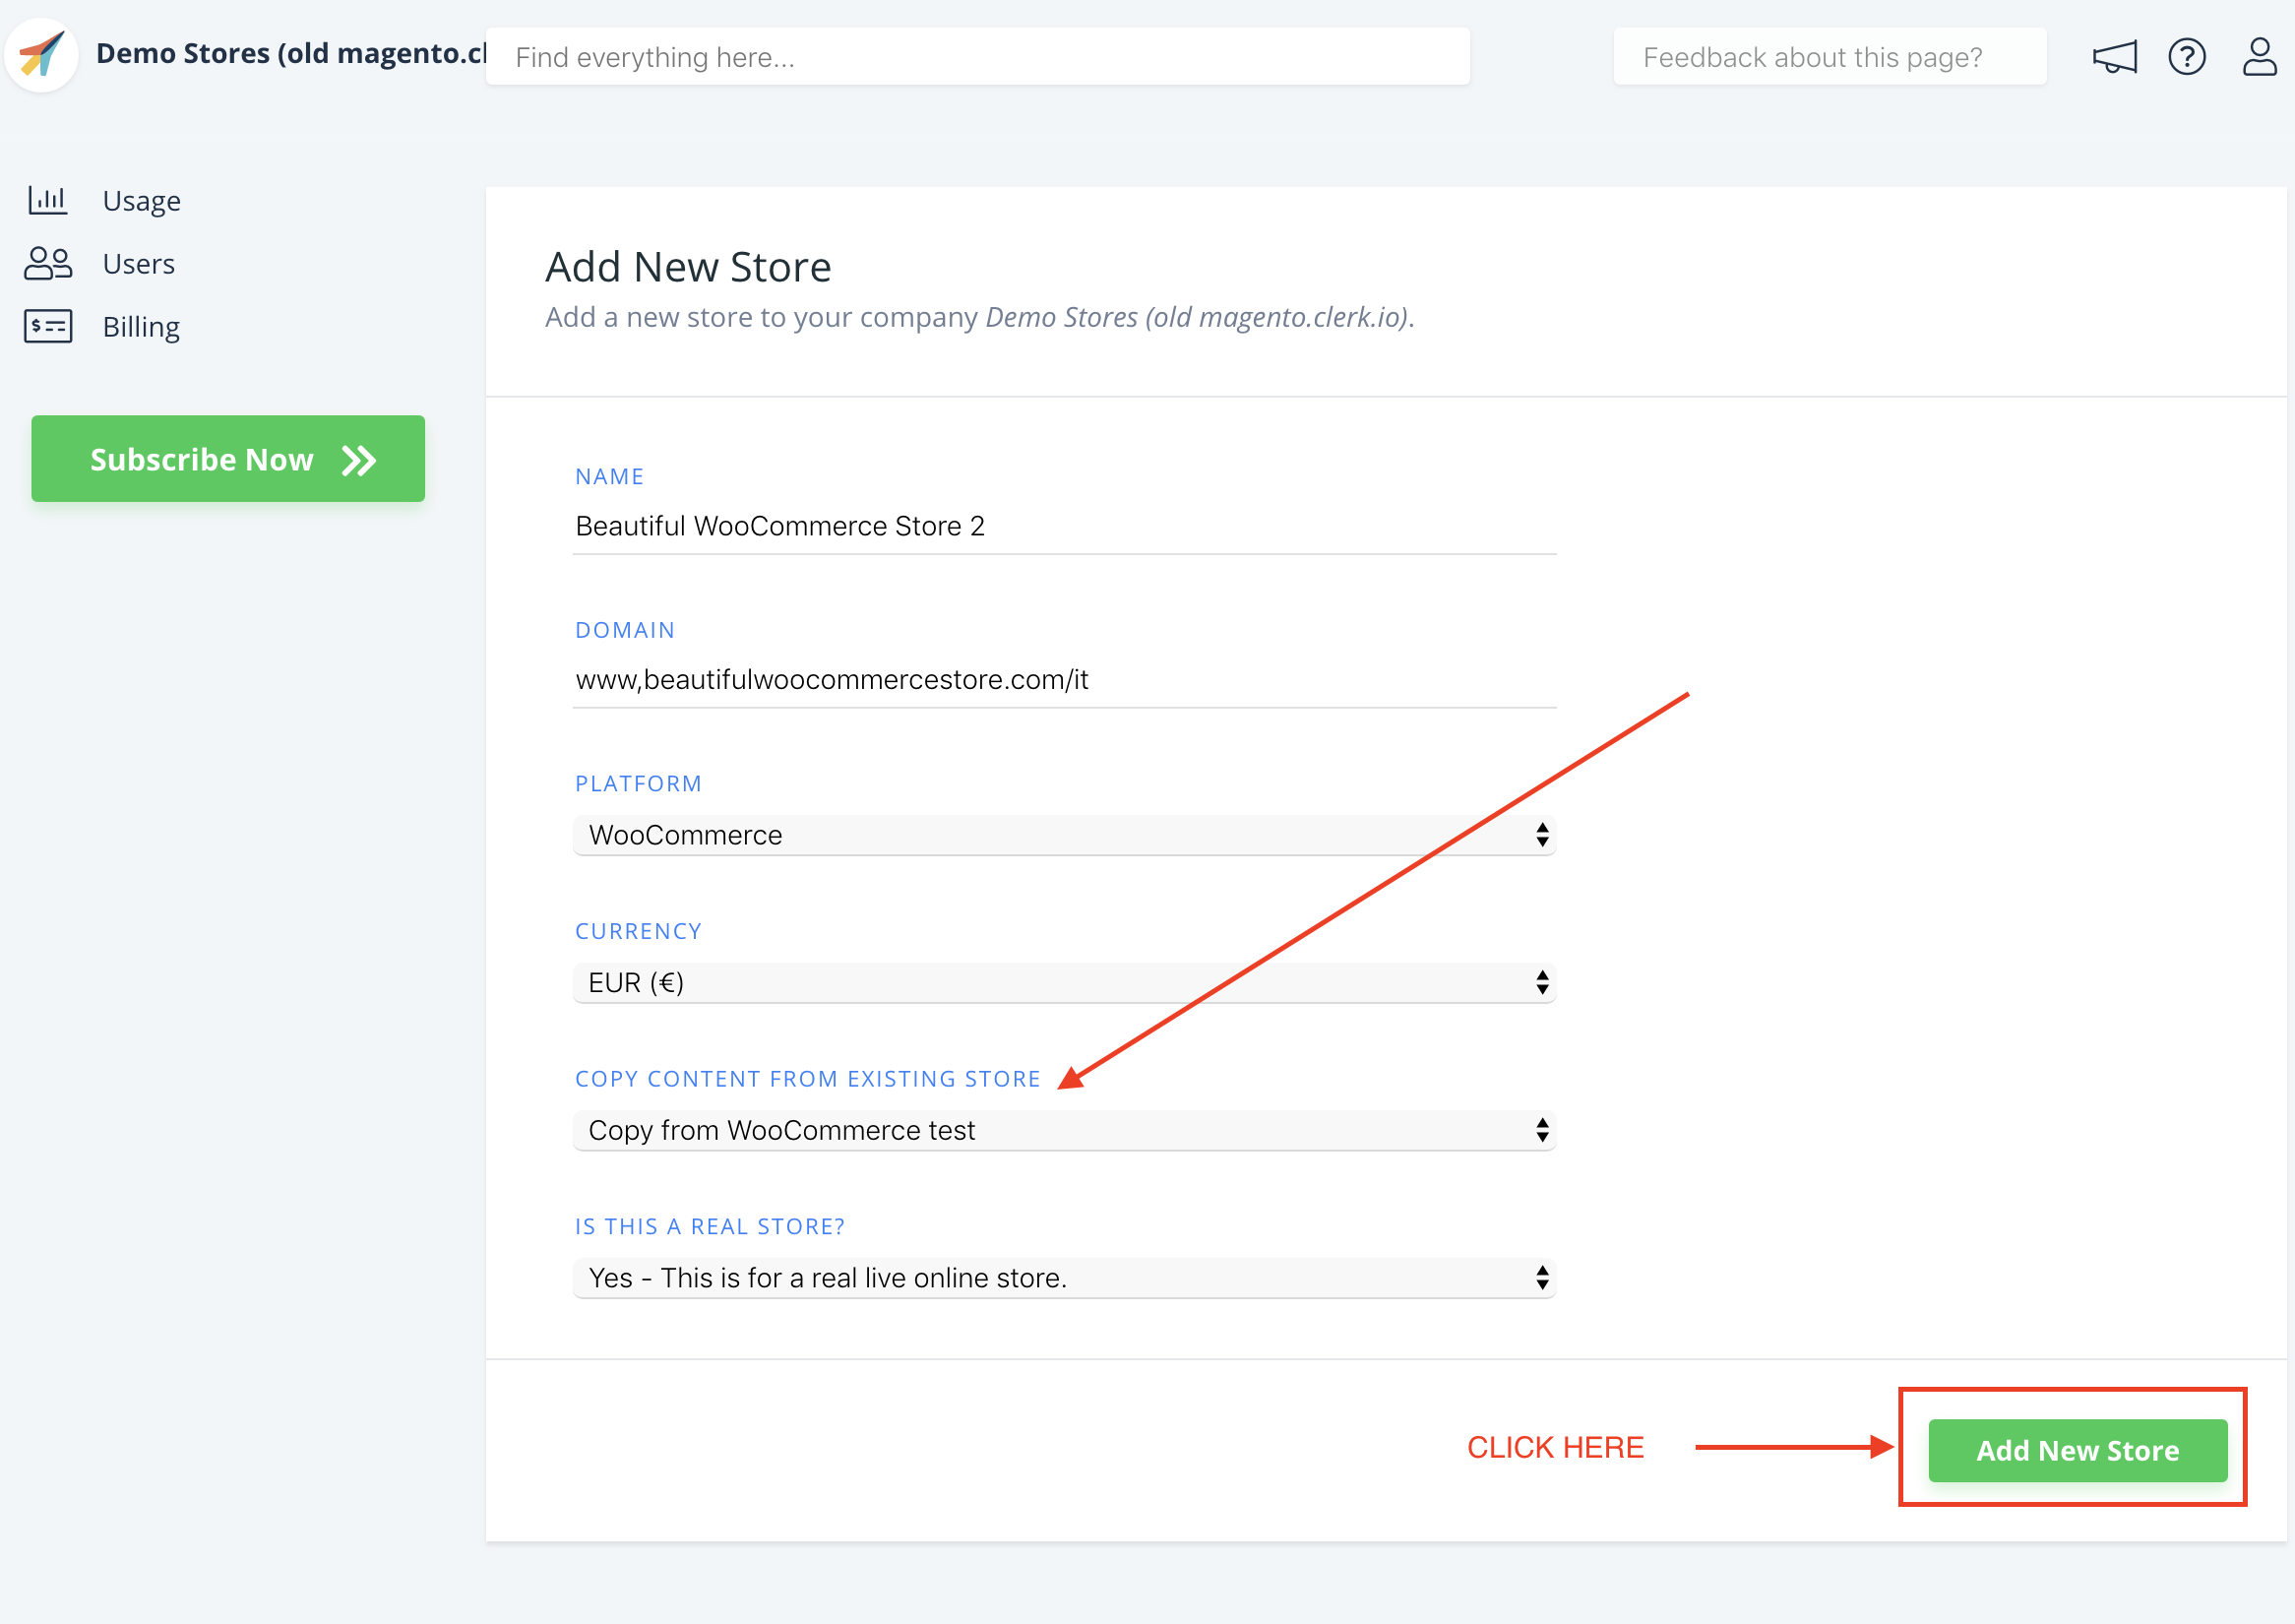
2. When you are done with the initial setup, go back to the start page of my.clerk.io (by clicking the Clerk.io logo in the upper left side corner of the side-menu) and then click "+ Add new store" the last option of the scroll down list (generally under you the existing store(s) and your company name):
3. On the Add New Store page, click Advanced to see all settings.
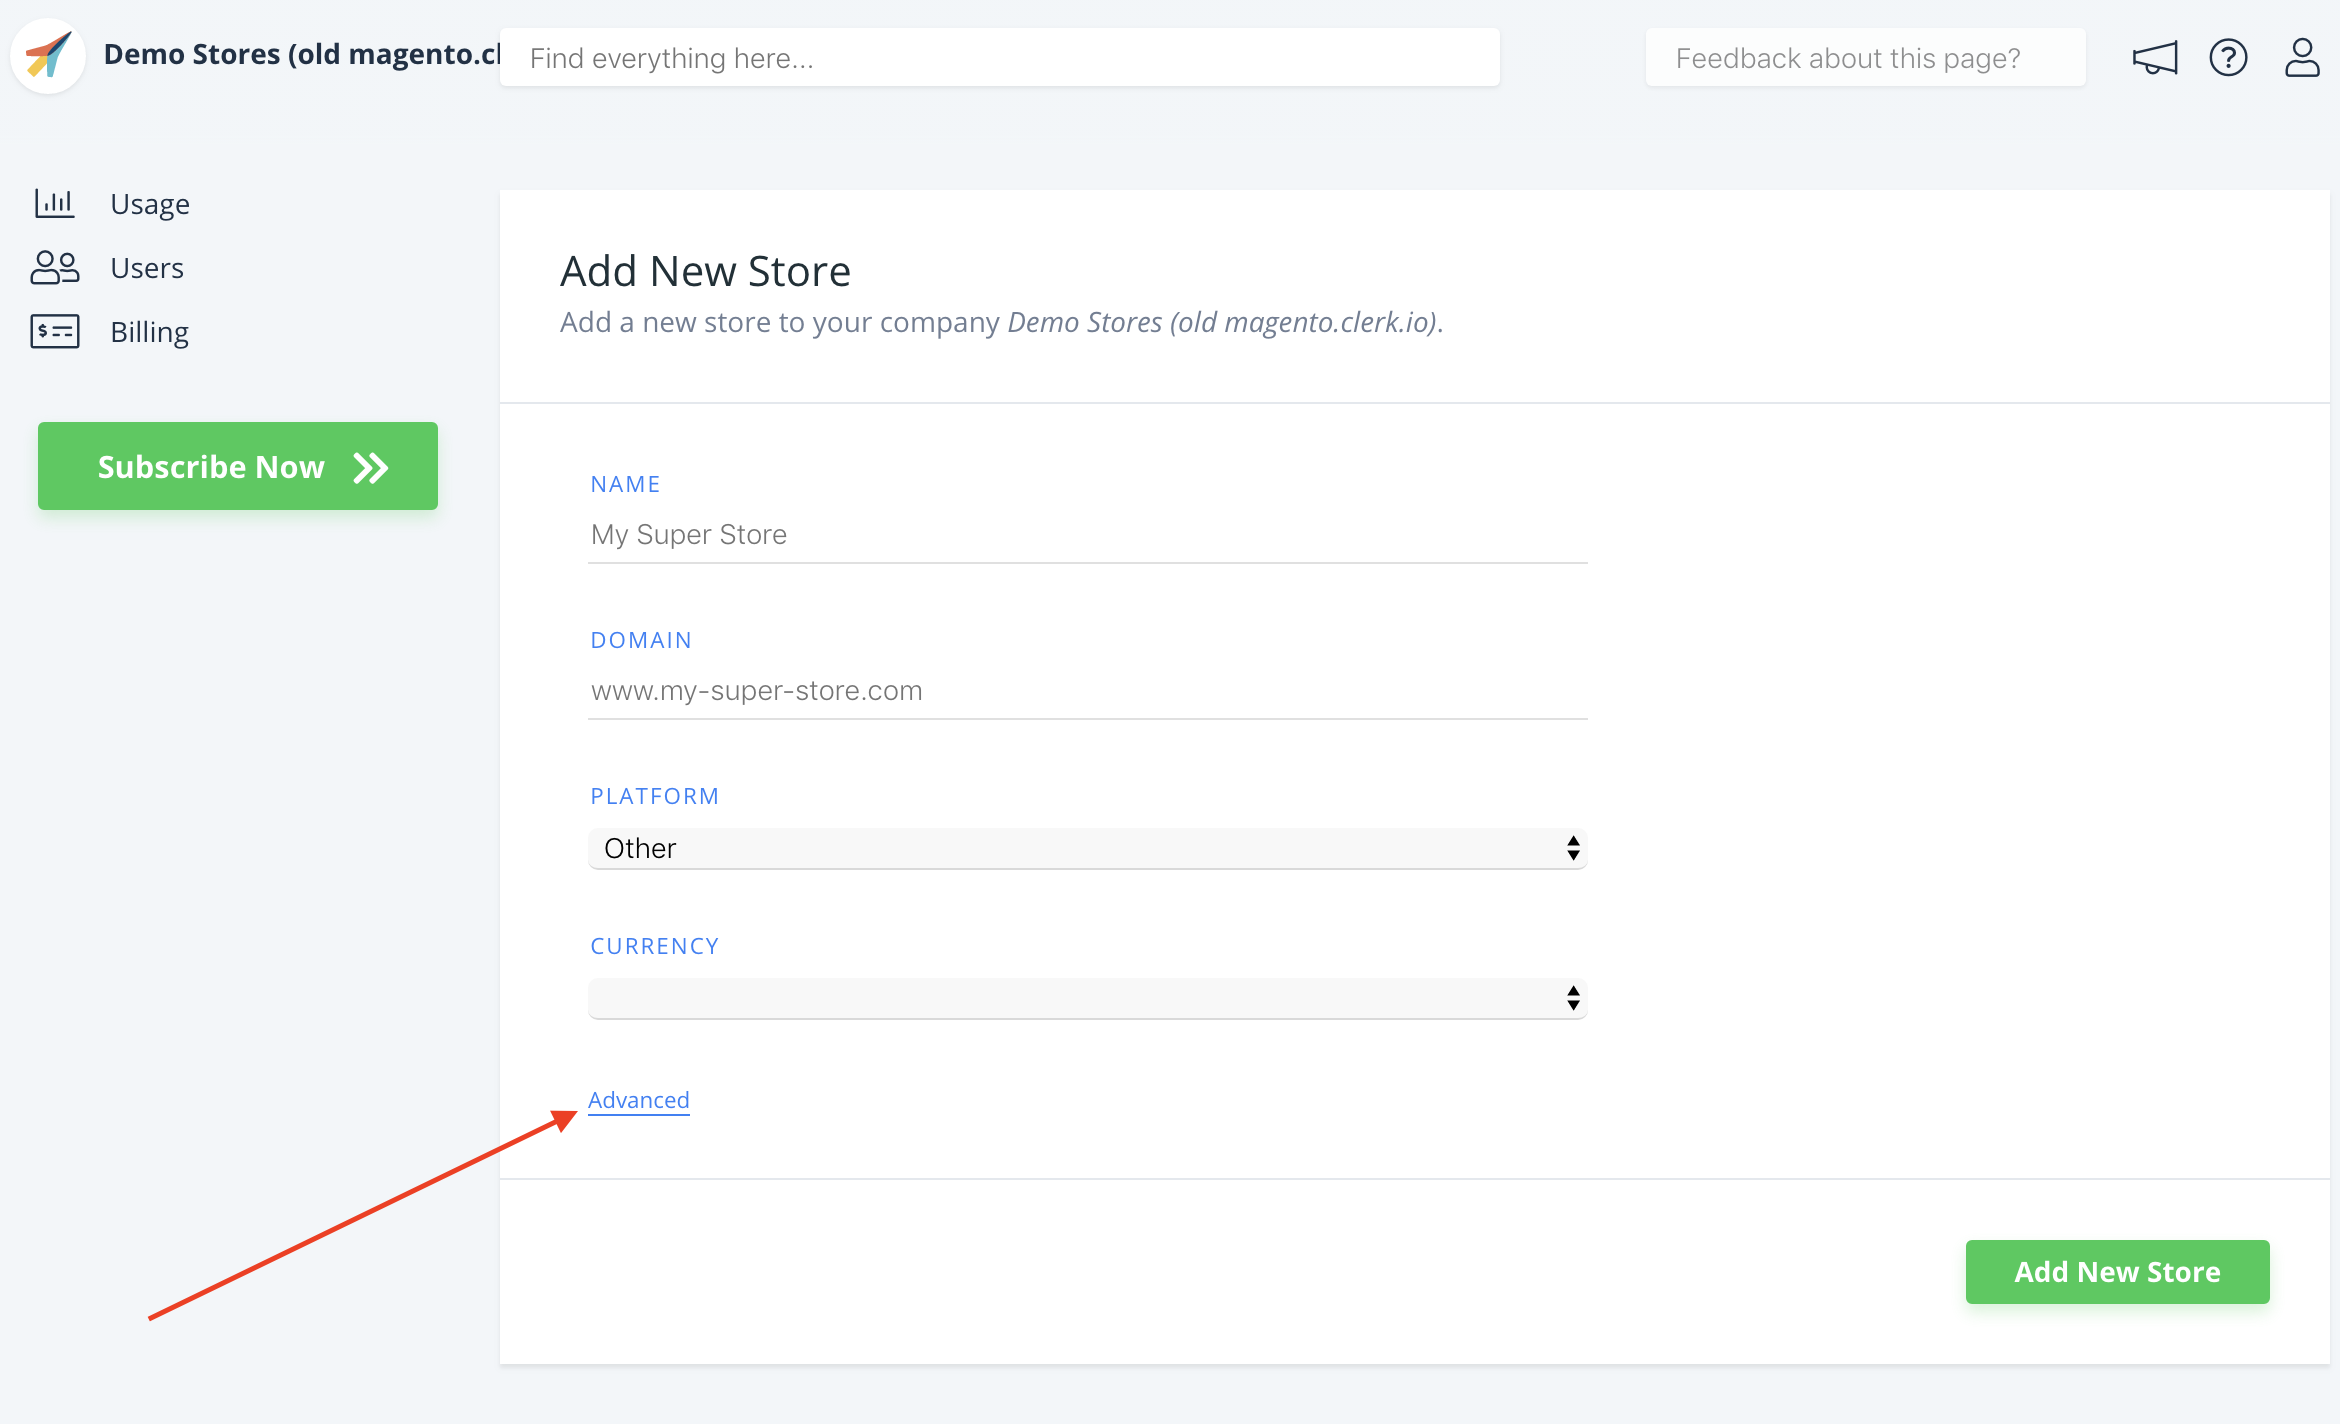
4. Fill in the details of your webshop, and choose your main Store from the Copy Content From Existing Store dropdown, then click Add Store.
This will carry over the Content and Designs from your main Store.
Remember to translate Headlines, in Content-> Edit -> Select Design to the right language as well.
2. Extend the plugin
Instead of using the plugin page in WooCommerce to add the public and private keys, you will need to manually each pair in the plugin files, and use them for each language respectively.
Below are descriptions of the 3 files you need to change.
2.1. plugins > clerk-woocommerce-x.x.x > includes > class-clerk-rest-api.php
This file is responsible for authorising each store to receive the product, category and order data from your domain.
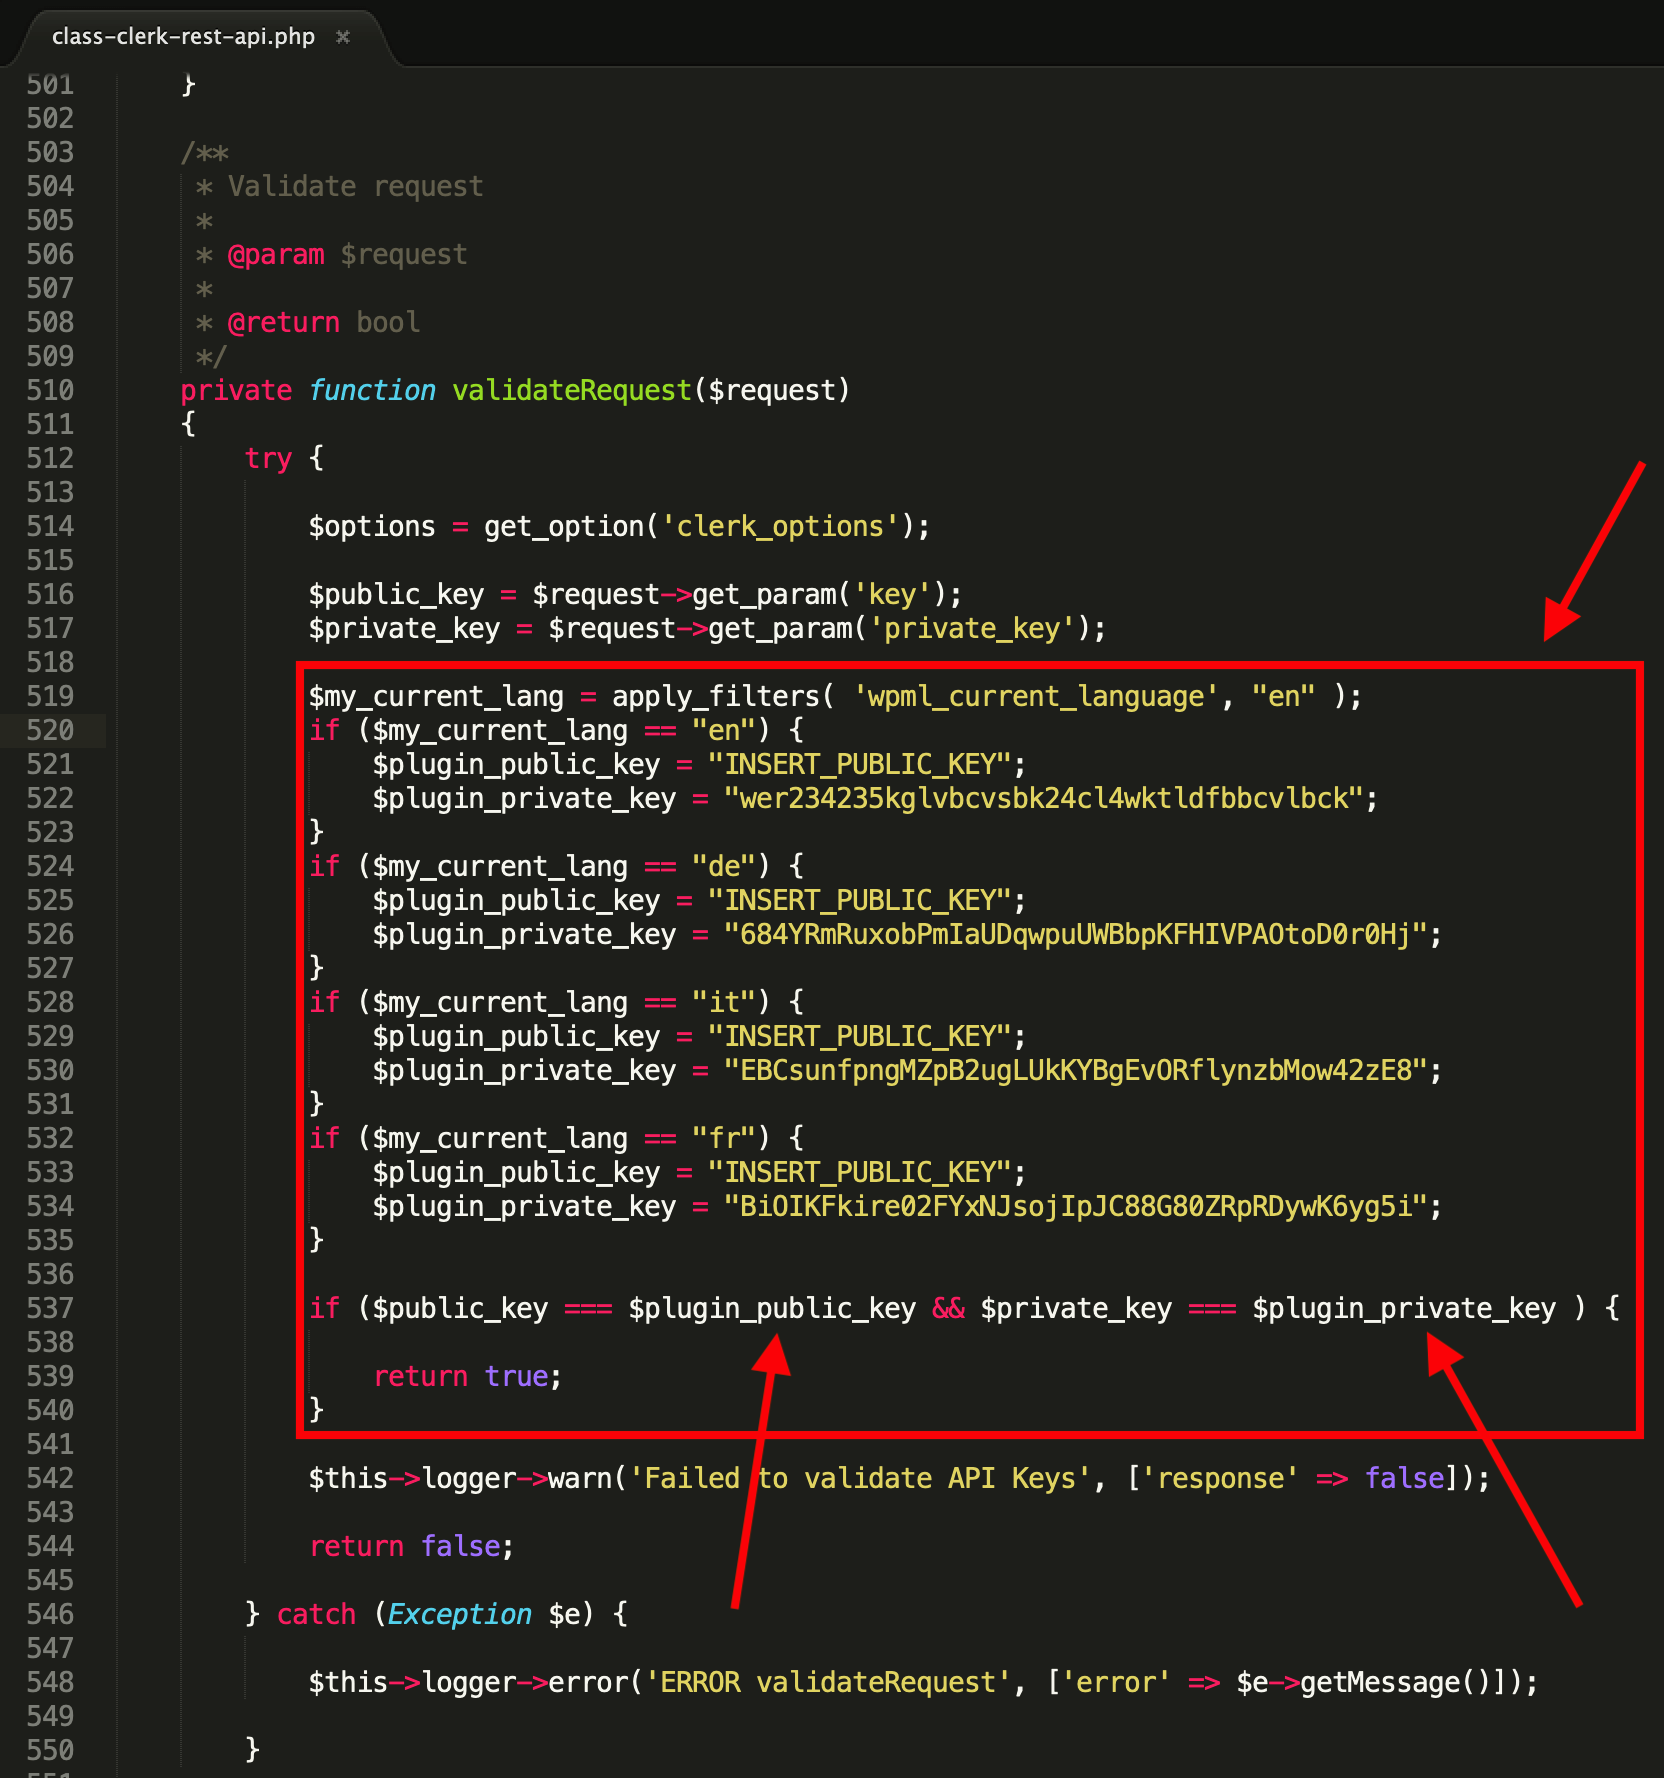
The following code can be used to check the languages, and authorise them based on the Stores you created in my.clerk.io.
Make sure that you are using the correct language codes. The below example uses english(en), german(de), italian(it) and french(fr).
Also, replace INSERT_PUBLIC_KEY and INSERT_PRIVATE_KEY with the correct Public and Private keys from your Store:
$my_current_lang = apply_filters( 'wpml_current_language', "en" );
            if ($my_current_lang == "en") {
                $plugin_public_key = "INSERT_PUBLIC_KEY";
                $plugin_private_key = "INSERT_PRIVATE_KEY";
            }
            if ($my_current_lang == "de") {
                $plugin_public_key = "INSERT_PUBLIC_KEY";
                $plugin_private_key = "INSERT_PRIVATE_KEY";
            }
            if ($my_current_lang == "it") {
                $plugin_public_key = "INSERT_PUBLIC_KEY";
                $plugin_private_key = "INSERT_PRIVATE_KEY";
            }
            if ($my_current_lang == "fr") {
                $plugin_public_key = "INSERT_PUBLIC_KEY";
                $plugin_private_key = "INSERT_PRIVATE_KEY";
            }

            if ($public_key === $plugin_public_key && $private_key === $plugin_private_key ) {

                return true;
            }
Insert the code in the function private function validateRequest($request), and make sure to replace the bottom part, so only the above code has return true.
It should look like this:
2.2. plugins > clerk-woocommerce-x.x.x > includes > class-clerk-visitor-tracking.php
This file is responsible for fetching the correct language results based on the Public API key from your Stores in my.clerk.io.
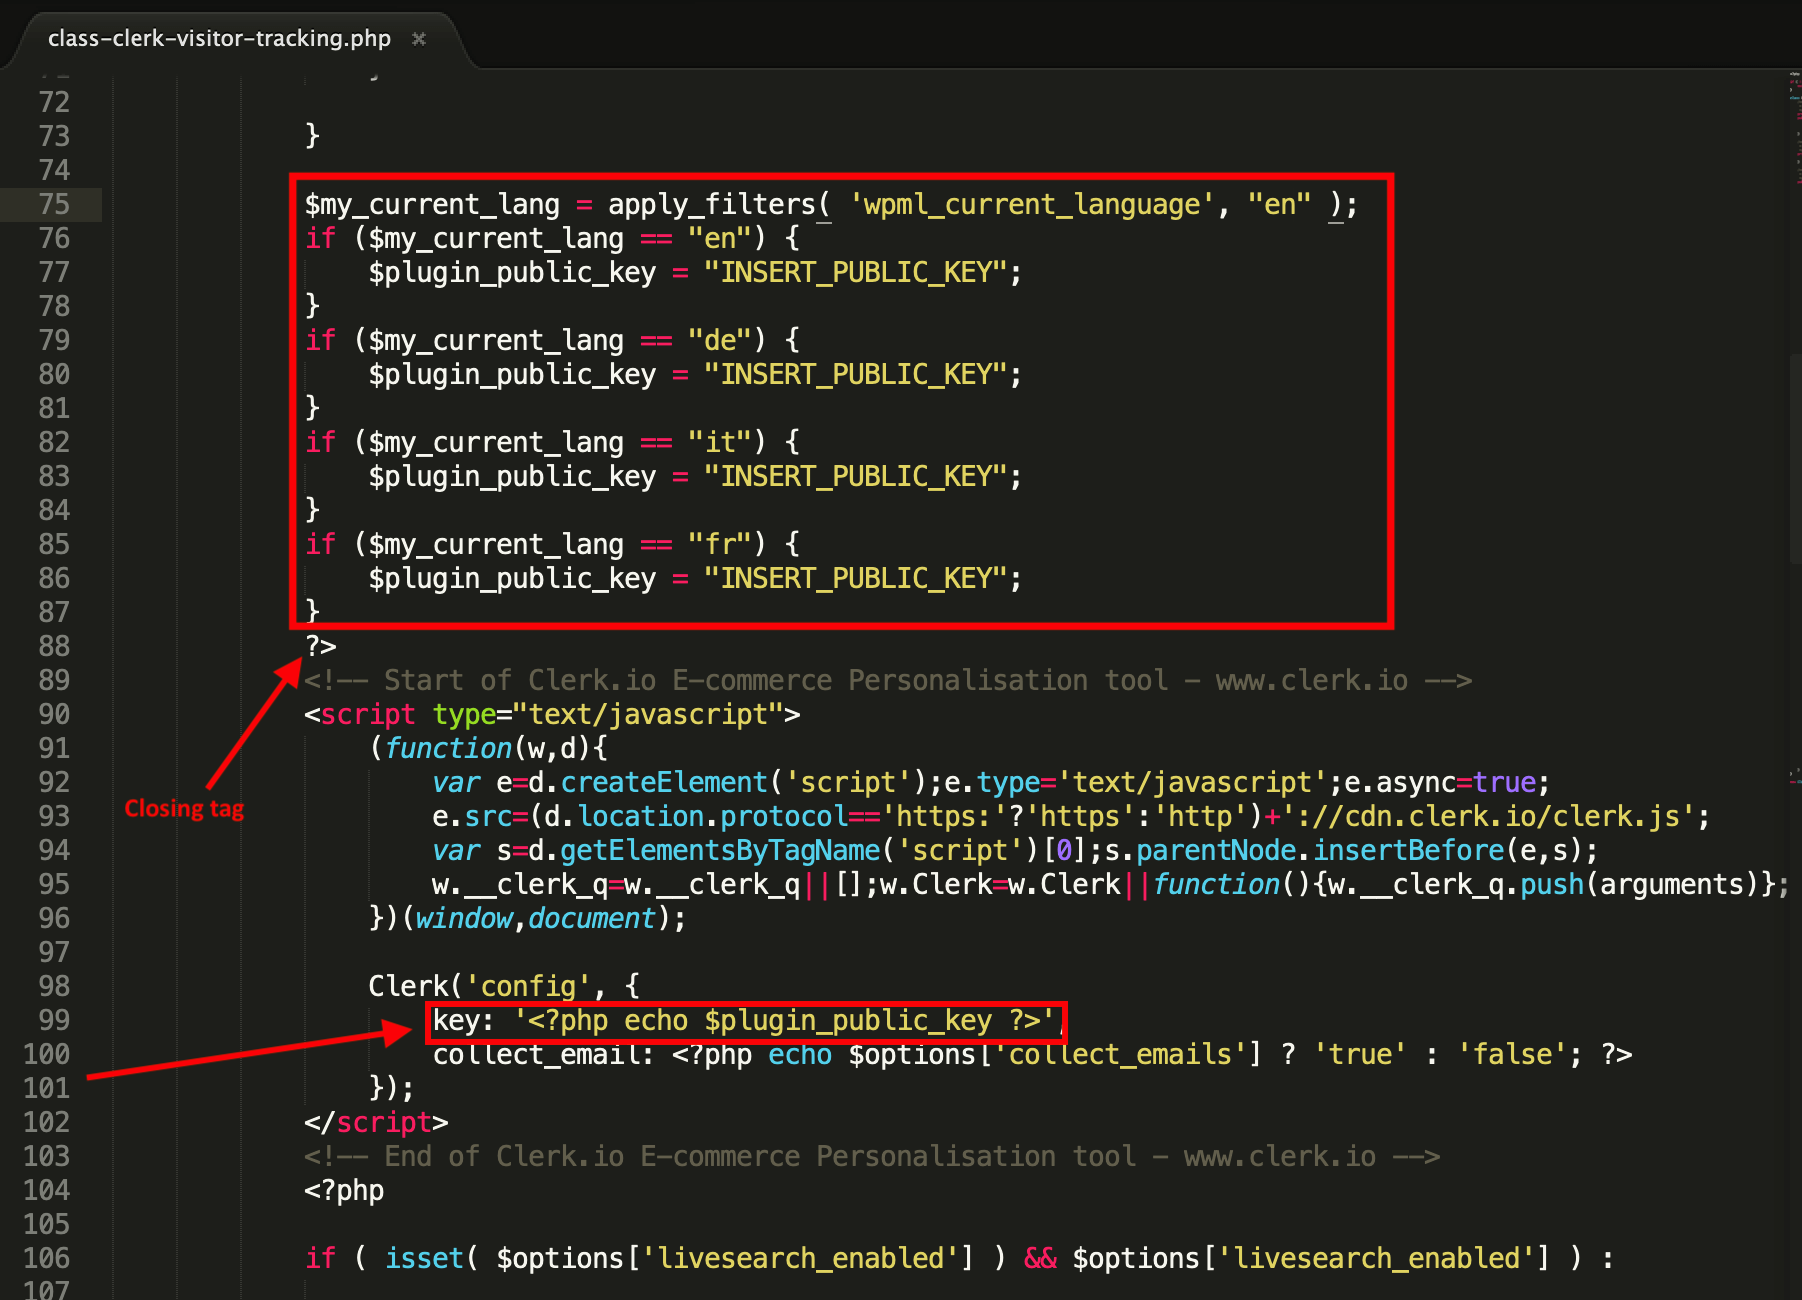
Insert the following code near the tracking-script, just before the closing ?> tag and again, make sure that you are using the correct language codes and replace INSERT_PUBLIC_KEY with the correct Public key from your Store:
$my_current_lang = apply_filters( 'wpml_current_language', "en" );
            if ($my_current_lang == "en") {
                $plugin_public_key = "INSERT_PUBLIC_KEY";
            }
            if ($my_current_lang == "de") {
                $plugin_public_key = "INSERT_PUBLIC_KEY";
            }
            if ($my_current_lang == "it") {
                $plugin_public_key = "INSERT_PUBLIC_KEY";
            }
            if ($my_current_lang == "fr") {
                $plugin_public_key = "INSERT_PUBLIC_KEY";
            }
Then, inside Clerk('config', insert the following code as the key:
<?php echo $plugin_public_key ?>
Lastly, remove the set language in Clerk.js.
It this code that should be removed:
language: '<?php echo $Lang; ?>'
Check this screenshot to make sure your code looks correct:
2.3. plugins > clerk-woocommerce-x.x.x > includes > class-clerk-api.php
This file is responsible for real-time updates from each of the Stores.
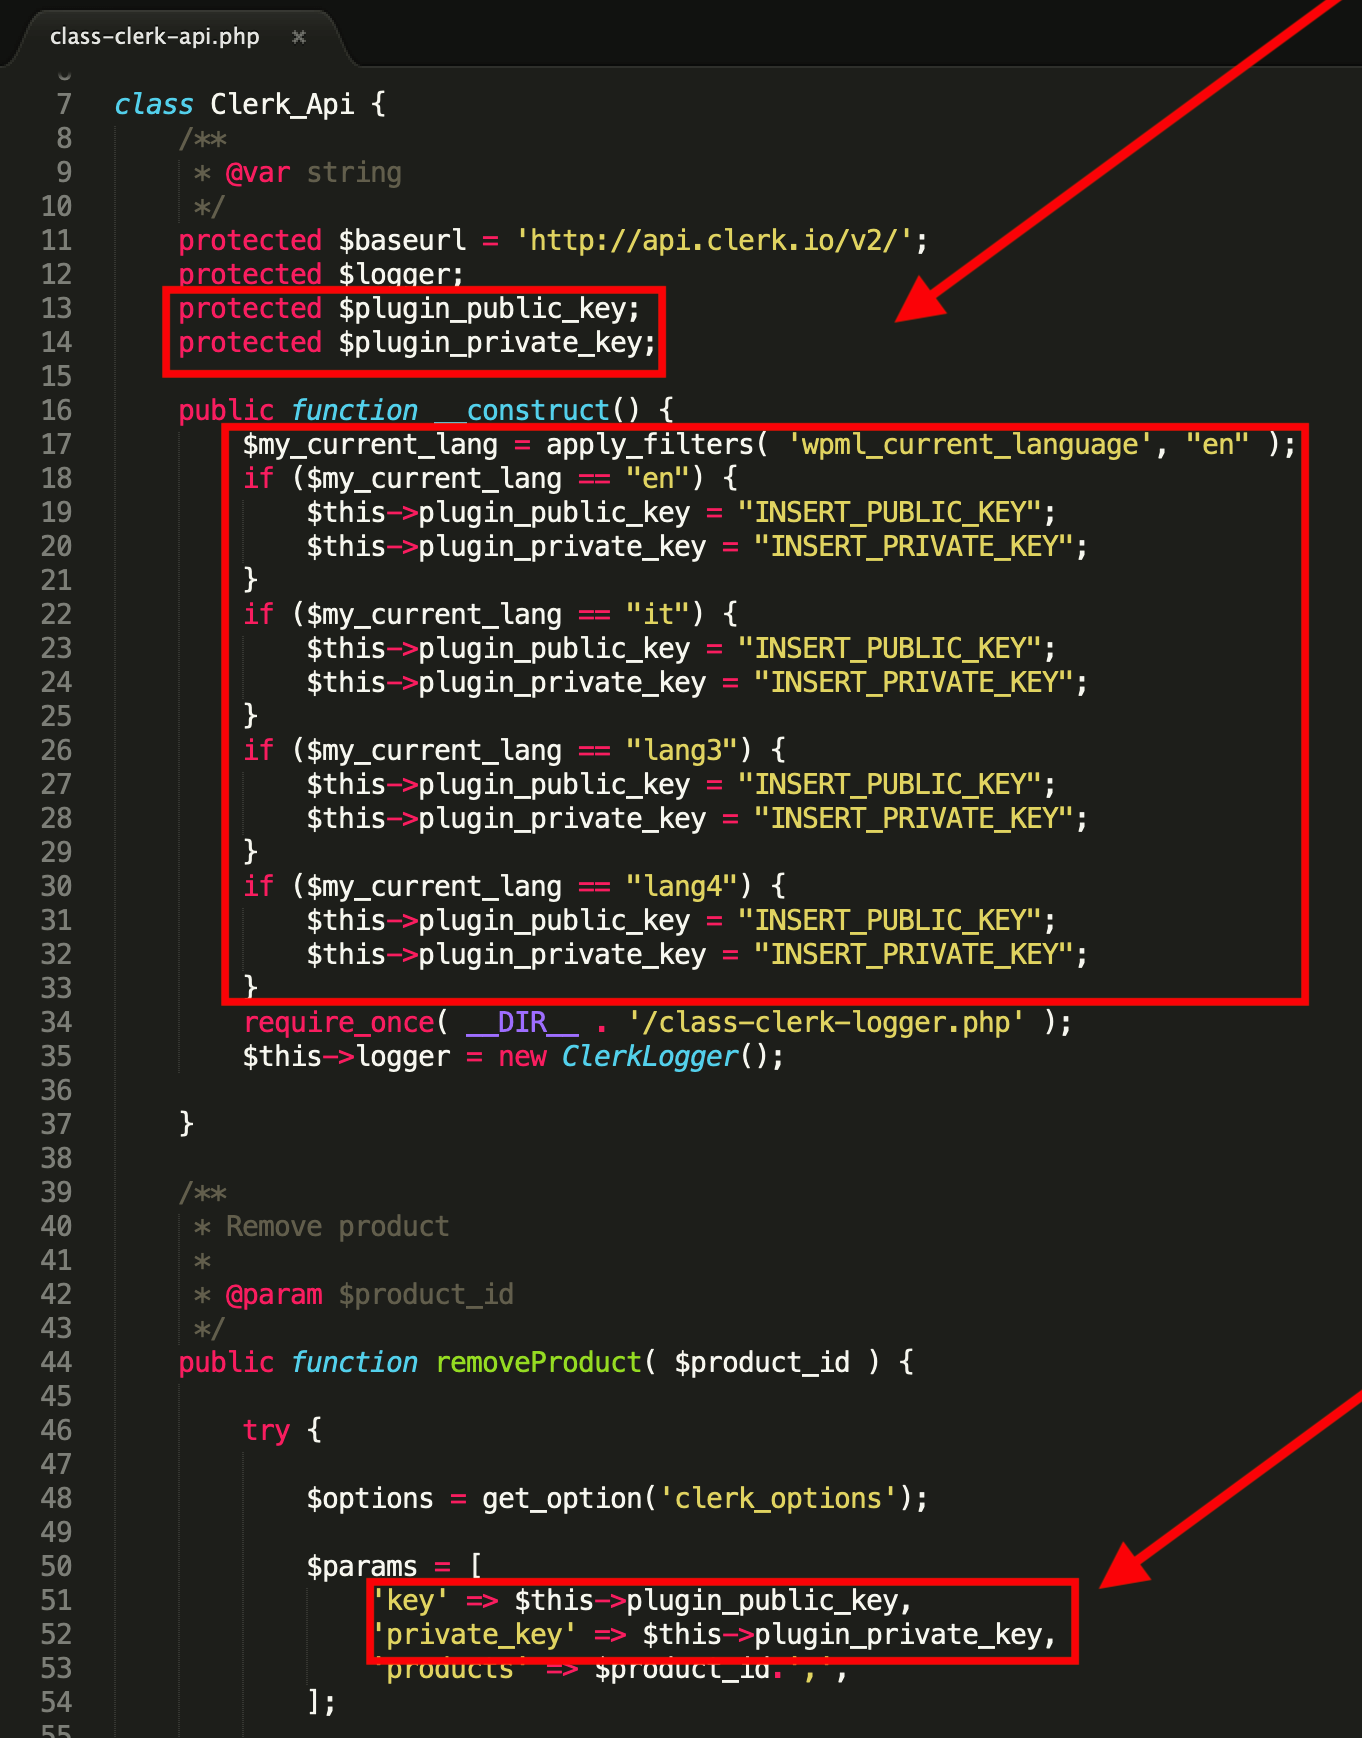
Start by adding the following two protected variables, below $logger:
protected $plugin_public_key;
protected $plugin_private_key;
Then, inside public function __construct() insert the following code, using your language codes and Public/Private API keys:
 $my_current_lang = apply_filters( 'wpml_current_language', "en" );
        if ($my_current_lang == "en") {
            $this->plugin_public_key = "INSERT_PUBLIC_KEY";
            $this->plugin_private_key = "INSERT_PRIVATE_KEY";
        }
        if ($my_current_lang == "it") {
            $this->plugin_public_key = "INSERT_PUBLIC_KEY";
            $this->plugin_private_key = "INSERT_PRIVATE_KEY";
        }
        if ($my_current_lang == "lang3") {
            $this->plugin_public_key = "INSERT_PUBLIC_KEY";
            $this->plugin_private_key = "INSERT_PRIVATE_KEY";
        }
        if ($my_current_lang == "lang4") {
            $this->plugin_public_key = "INSERT_PUBLIC_KEY";
            $this->plugin_private_key = "INSERT_PRIVATE_KEY";
        }
Lastly, use the following code to fetch the key and private_key inside each of the functions removeProduct, addProduct and getContent
'key' => $this->plugin_public_key,
'private_key' => $this->plugin_private_key,
Check the screenshots below to make sure your code looks correct:
3. Sync your domains
Once you have extended the plugin, you can now sync each of your Stores with their language domain.
As you have already installed the extension you can skip the first step directly start configuring it and syncing data.
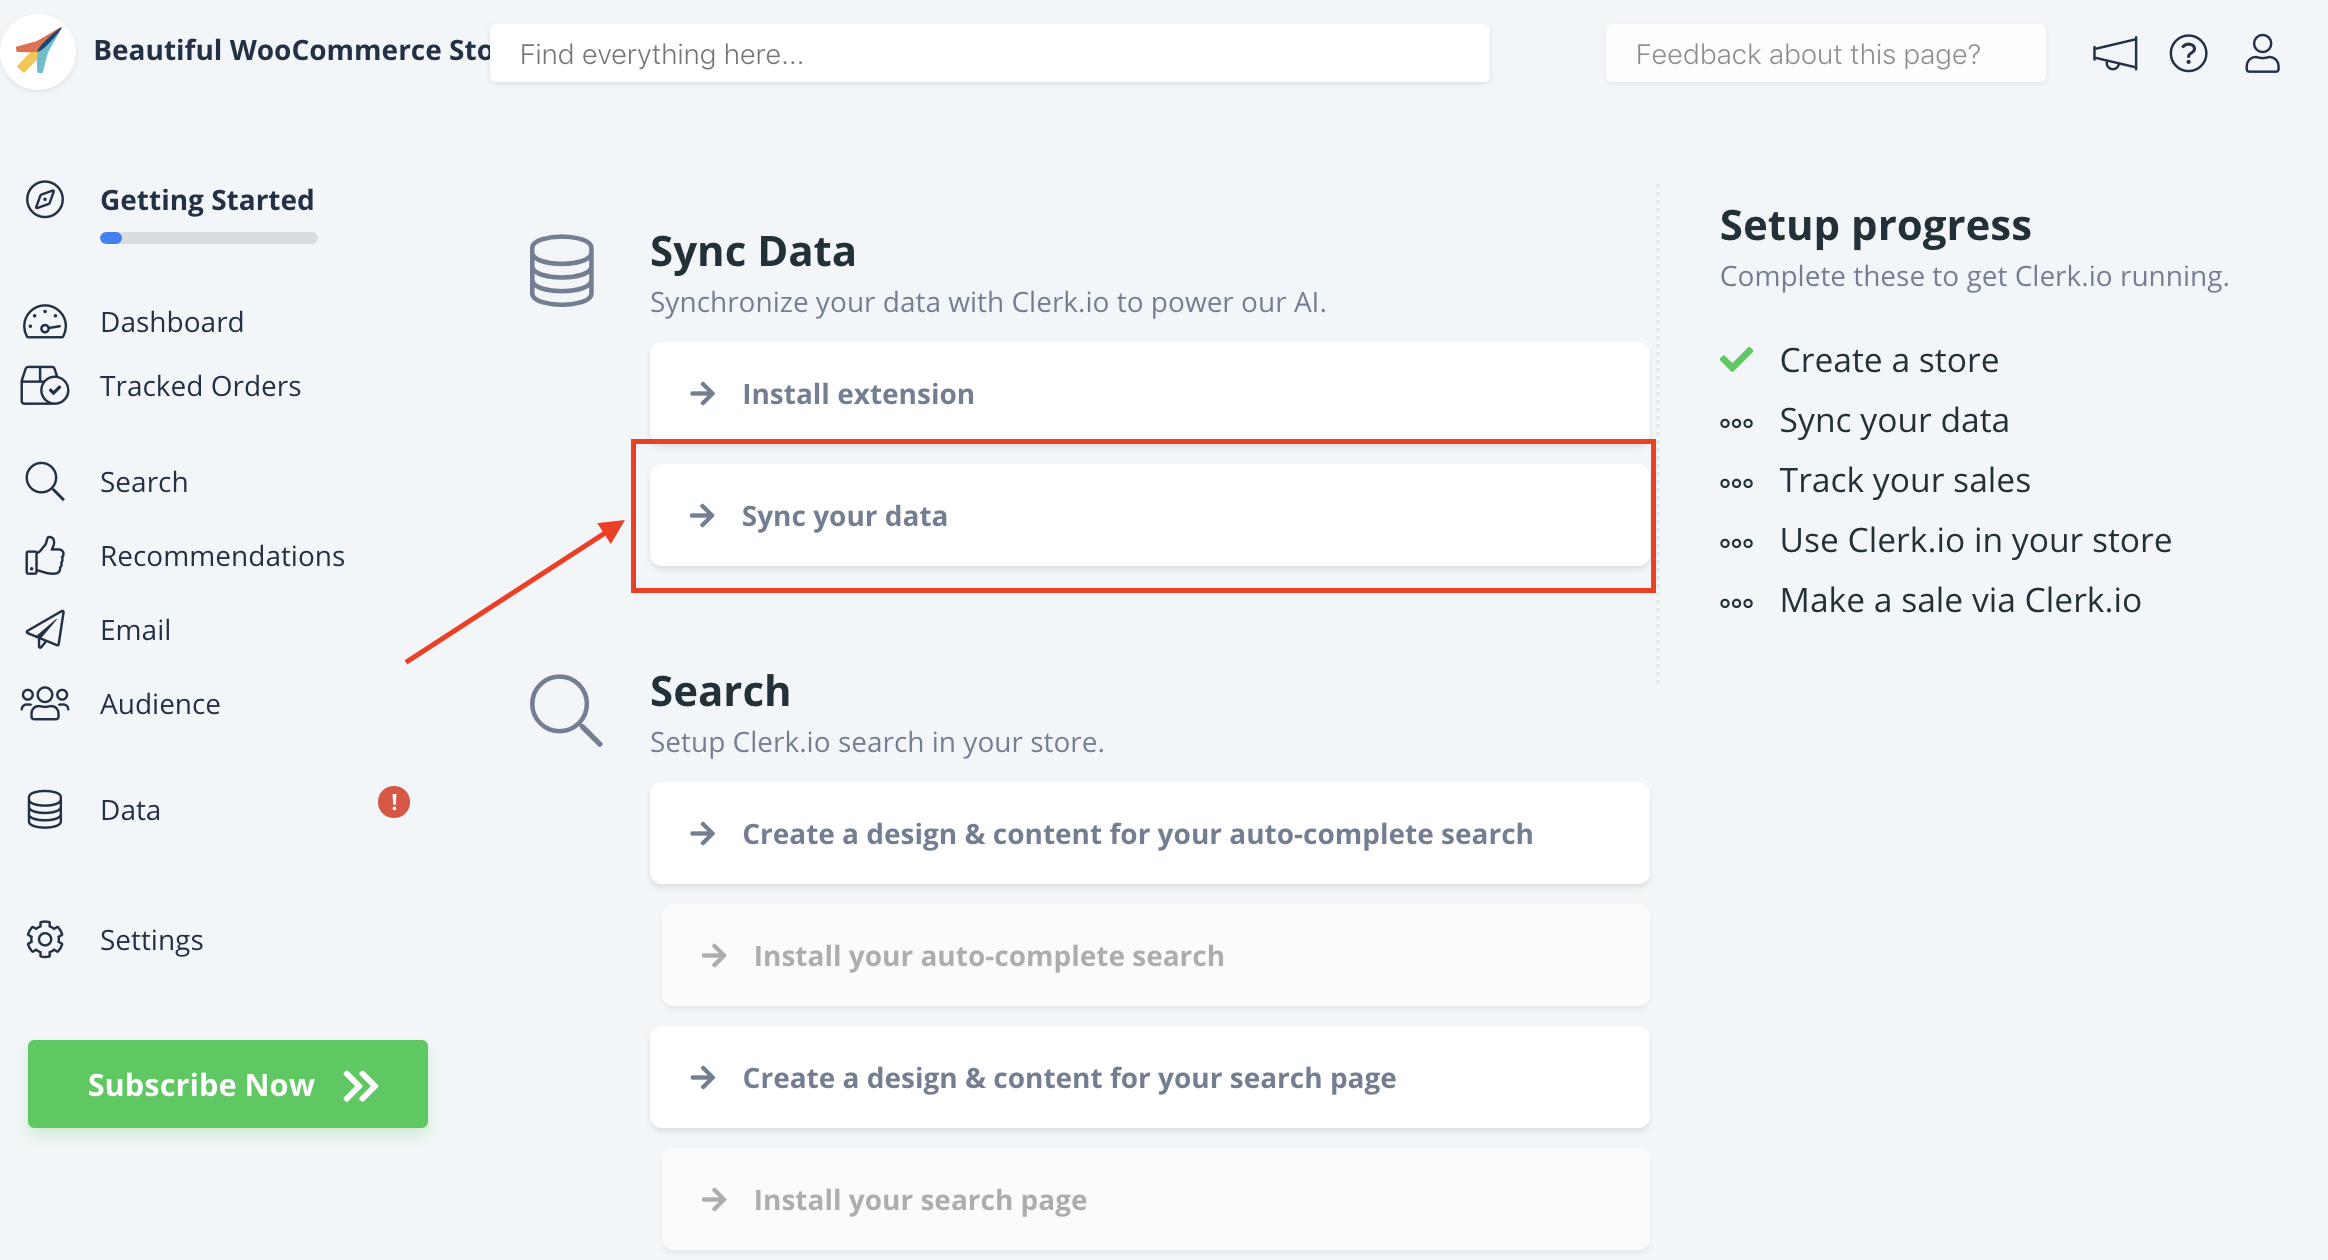
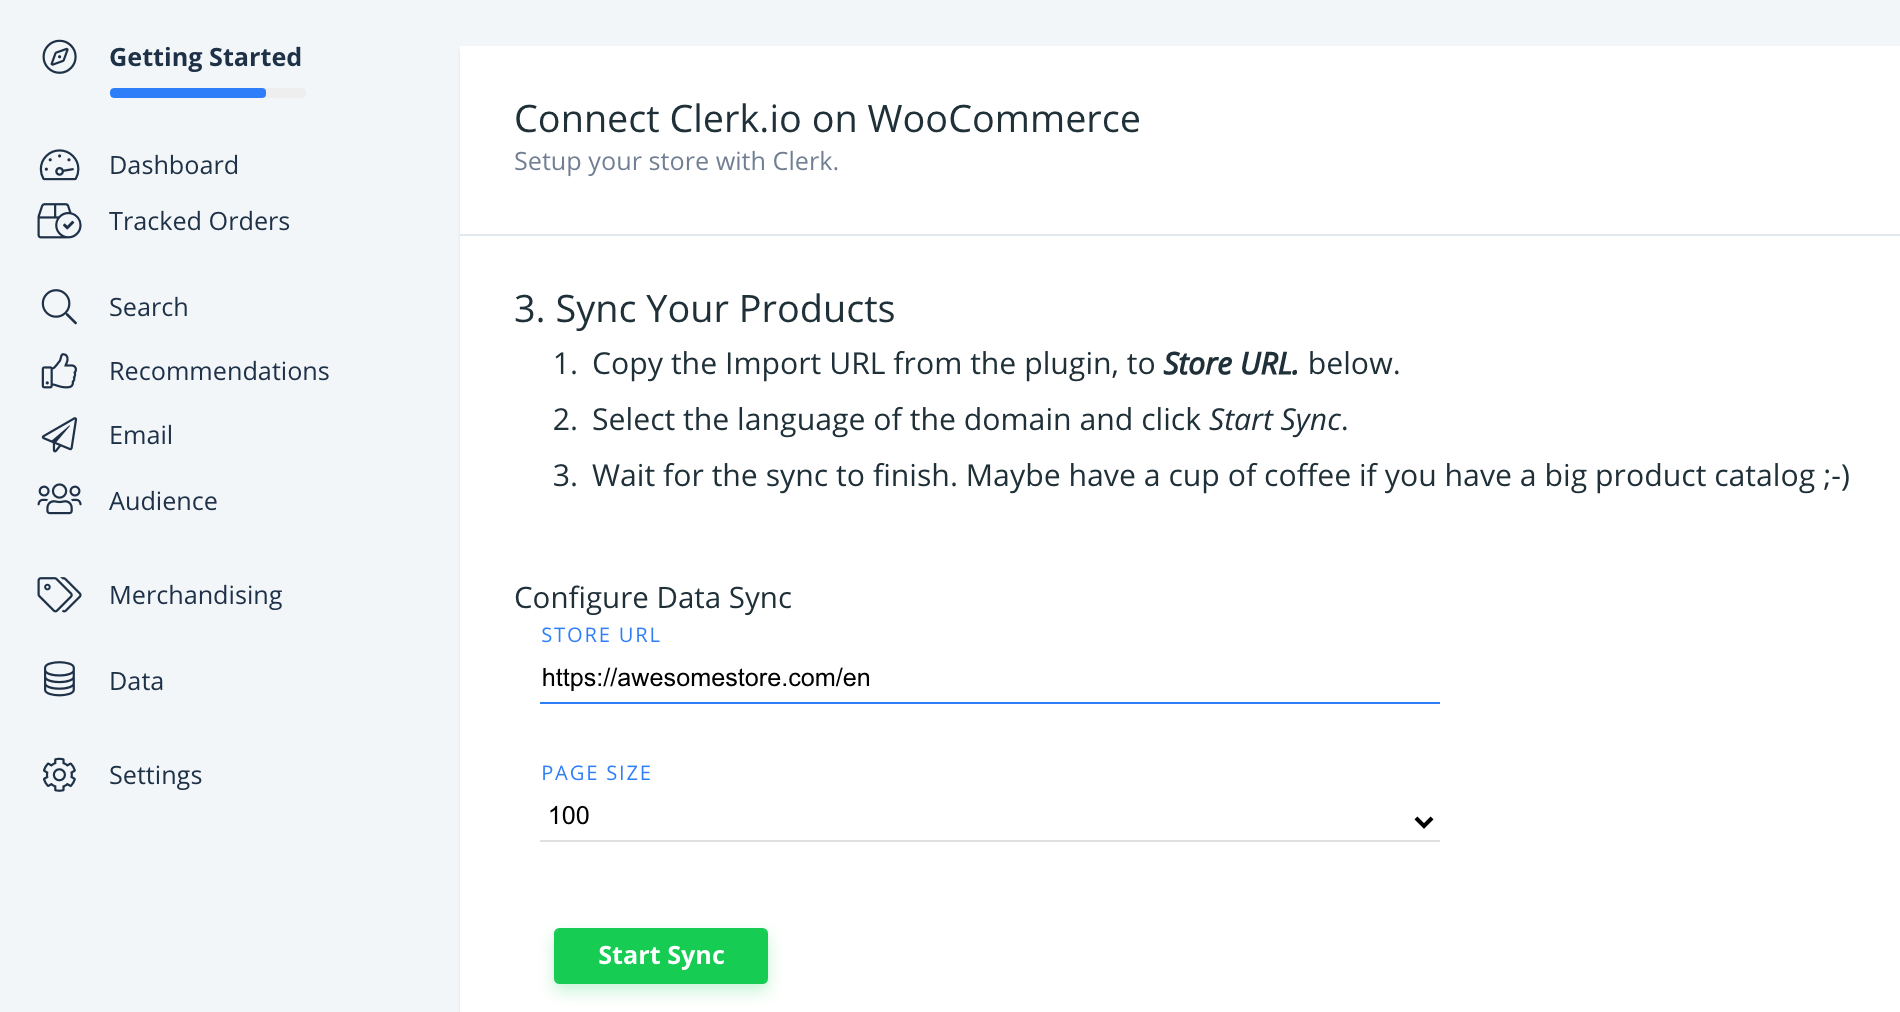
8. When the Sync has finished, your domain is ready and using the same setup as your main Store.
