How to show the best Cross-Sell products when your customers add products to the cart.
Adding the Powerstep
1. Login to your Shopify backend and go to Online Store -> Themes -> Actions -> Edit Code
2. Find the file that generates your product-page. Usually this is Sections -> product-template.liquid
3. Copy the following code to the bottom of the file:
<script>
    document.addEventListener('DOMContentLoaded', function(){
    const buyBtn = (document.querySelector('[data-add-to-cart]')) ? '[data-add-to-cart]' : '.product-form__submit';
    const prodPage = (document.querySelector('[data-section-id="product-template"] > div')) ? '[data-section-id="product-template"] > div' : '.product-section > section';
    const clerkPowerstep = document.getElementById('clerk_powerstep');

    document.querySelector(buyBtn).addEventListener('click', open_powerstep);

    function open_powerstep() {
        Clerk('content', '.clerk-powerstep-recommendations');

        clerkPowerstep.style.display = 'block';
        clerkPowerstep.style.padding = '5px 15px';
        clerkPowerstep.classList.toggle('animate_top');

        setTimeout(function(){

            document.querySelector(prodPage).addEventListener('click', close_powerstep);
            document.getElementsByTagName('header')[0].addEventListener( 'click', close_powerstep );

        }, 500);
    }

    });

    function close_powerstep() {
        var clerkPowerstep = document.getElementById('clerk_powerstep');
        //window.location.reload();
        clerkPowerstep.style.display = 'none';
    }
</script>
<style>
    @keyframes top {
        from {
        top: -100%;
        }
        to {
        top: 50%;
        }
    }

    .animate_top {
        animation: top 100 ease-in-out;
        top: 50% !important;
    }
    #clerk_powerstep {
        width: clamp(45ch, 50%, 100ch) !important;
        left: 50% !important;
        transform: translate(-50%, -50%) !important;
        margin: 0px !important;
        border: 3px solid #888 !important;
        border-radius: 2px !important;
        position: fixed;
        top: -100%;
        z-index: 999;
        display: none;
        background-color: white;
        box-shadow: 0px 8px 40px 0px rgba(0,0,60,0.15);
        transition-property: all;
        transition-duration: 1s;
        transition-timing-function: ease-in-out;
    }

    #clerk_powerstep h2 {
        text-align: center;
    }

    .clerk_powerstep_image {
        text-align: center;
        display: flex;
        justify-content: center;
        flex-direction: column;
    }

    .clerk_powerstep_image img {
        object-fit: contain;
        max-height: 240px;
        height: 25vh;
        margin: auto;
    }

    .clerk-popup-close {
        position: absolute;
        right: 5px;
        top: 5px;
        cursor: pointer;
        font-family: Arial;
        font-size: 32px;
        line-height: 1;
        color: gray;
        z-index: 2;
        padding: 3px;
    }
    .clerk_powerstep_header {
        position: relative;
    }

    .clerk_powerstep_wrap {
        position: relative;
        overflow-y: scroll;
        overflow-y: overlay;
        max-height: 80vh;
        -ms-overflow-style: none;  /* IE and Edge */
        scrollbar-width: none;  /* Firefox */
    }
    .clerk_powerstep_wrap::-webkit-scrollbar {
      display: none;
    }
    .clerk_powerstep_actions {
        display: flex;
        flex-direction: row;
        justify-content: space-around;
    }

    .clerk_powerstep_actions button {
        margin: 0 0 10px 0;
    }

    @media only screen and (max-width: 800px){
        .clerk_powerstep_actions {
            display: flex;
            flex-direction: column;
            justify-content: center;
            align-items: center;
        }
    }
</style>

<div style="display: none;" id="clerk_powerstep">
    <span class="clerk-popup-close" onclick="close_powerstep()">✕</span>
    <div class="clerk_powerstep_wrap">
        <div class="clerk_powerstep_header">
        <h2>You added <b><u></u></b> to your cart.</h2>

        </div>

        <div class="clerk_powerstep_image">
        <img src="" alt="You added <b><u></u></b> to your cart.">
        </div>

        <div class="clerk_powerstep_actions">
            <button class="powerstep_continue button btn" onclick="location.href='';">Continue to Checkout</button>
            <button class="powerstep_close button btn" onclick="close_powerstep();">Continue Shopping</button>
        </div>
        <br>
        <span class="clerk-powerstep-recommendations"
            data-template="@power-step-others-also-bought"
            data-products="[]">
        </span>
        <span class="clerk-powerstep-recommendations"
            data-template="@power-step-visitor-complementary"
            data-products="[]"
        ></span>
        <span class="clerk-powerstep-recommendations"
            data-template="@power-step-popular"
            data-products="[]"
        ></span>
        <span class="clerk-powerstep-recommendations"
            data-template="@power-step-popular-on-sale"
            data-products="[]"
        ></span>
    </div>
</div>
Adjusting the Cart Type in your Shopify Theme
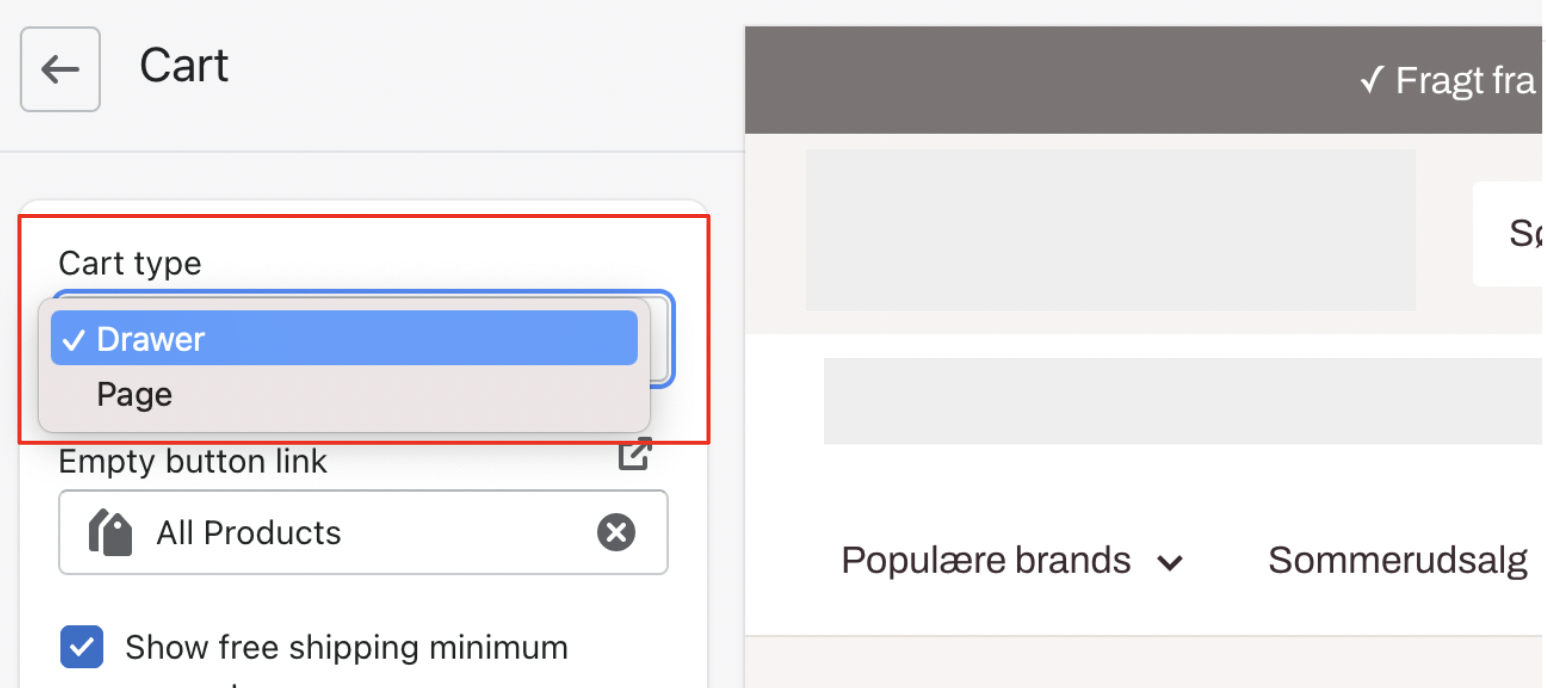
To change your Cart Type, follow the path Theme > Customize > Theme Settings > Cart > Cart type in your Shopify backend.
In the Cart type dropdown, be sure to select any option except for "Page". Options that appear in the dropdown depend on your webshop's theme, and may include "Drawer" or "Popup", among others.
Choosing an option other than "Page" is to avoid any page reload with activation of your Powerstep.

After creating these two files, adding the two lines to your Theme file, and updating your Cart Theme, your Powerstep should appear.